


Cornered Drunkard's Path Quilt Tutorial
Jenny Doan
Cornered Drunkard's Path Quilt Tutorial
- 2 packs x 10" Quilt Squares (Layer Cakes)
- 5 yards x Background Fabric
- 3 yards x 24" Wide Fusible Web
- 4-1/4 yards x Backing Fabric
- 1 x Easy Circle Cut Ruler


Finish your masterpiece and let us give it the finishing touch it deserves.
Subscribe to MSQC on YouTube
Hundreds of FREE tutorials and a new one from Jenny launches every Friday.
video transcript
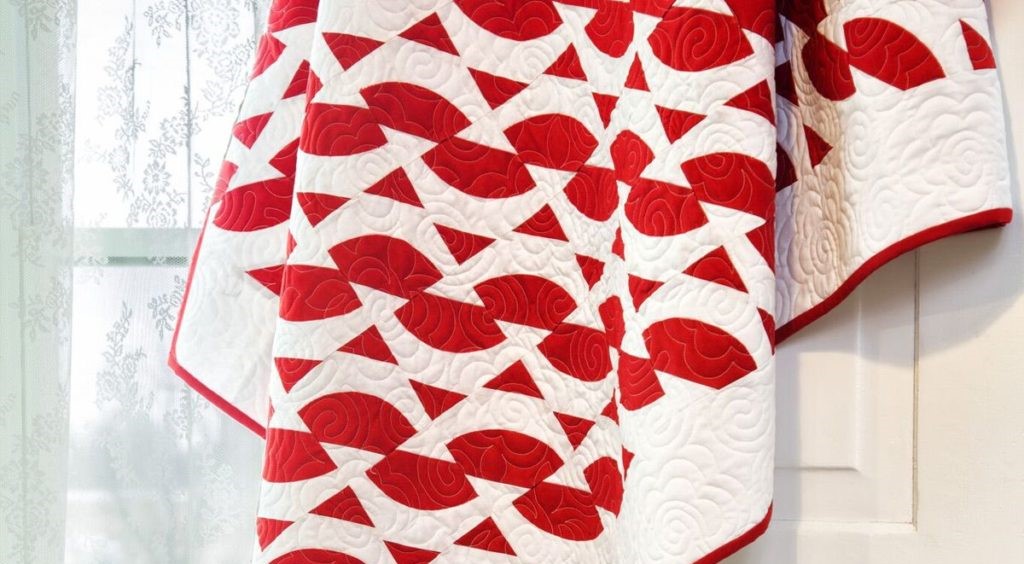
Hi everybody, it’s Jenny from the MSQC. And I’ve got a great project for you today. A few years ago I did a tutorial on the Drunkard’s Path, the easy way. And now we’ve taken that same Drunkard’s Path and put a couple of corners on it and look what happens. I mean it’s just completely different. So let’s take a look at this quilt behind me. Now this just looks like so much work, I mean. But wait til you see how we’re going to do this. I mean it just goes together so easy and so quick and makes a beautiful quilt. Also there’s loads of things you can do with it as you lay it out. So to make this quilt what you’re going to need is a circle cut ruler. You’re also going to need some fusible, three yards of it. We used Steam a Seam Lite. Then you’re also going to need some fabric. And of course we all have lots of fabric and we all love a red and white quilt. It just makes it really fun. I’ve used the Cotton Supreme Redworks and Optical White by RJR and it’s just perfect. So now let me show you how to make this because this is a really easy block to do. The first thing you’ve got to do is you’ve got to make a circle. And your circle needs to be backed with your fusible. So I have some fusible here. And I’ve cut a ten inch square so it fits right on my ten inch square. And we’re going to iron that down. And I’m just going to bring that over here to the iron and I’m just going to iron that on here. And I”m going to flip it over and I’m going to iron it both sides. Hopefully it will get a nice good stick on it. Move it kind of slow. Alrighty. With any luck, that’s long enough. Alright so what we’re going to do now is we’re going to fold this in half like this. And then I”m going to get my circle cut ruler. Now this is kind of a fun ruler because it has all kinds of sizes of sizes of circles on here. We’re going to use a seven inch circle. And you can see this bold line right here. I’ll move this up so you can see the bold line, that’s where it says is your fabric fold line. So remember we folded our block in half. We set that on the line like this. We’re going to hold this down. And we’re going to use a littler rotary cutter. I have this, I don’t know what millimeter this is. I think it’s like 18. But it will fit right in here and it makes your curve pretty easy. So watch that your ruler doesn’t slide like mine just tried to move on me. And we’re going to go there. And you should have, your circle should come out pretty good. I got everything but this little edge which I can take care of pretty easily. Oops, hang on. There we go. Now this is terrible. Alright, here we go. Alright there we go. Whew! I thought I was going to have to cut it a third time, that would have been really bad. Alright so then you’re going to take your, your circle and you’re going to adhere it to the back of your background square. This is such an easy way to make a Drunkard’s Path. With a normal Drunkard’s Path there’s a lot of, you set in all of those curves. This one we’re just going to put it right on top like this. And so what I like to do is I like to fold my background square in half and in half again so I have a nice, a good middle over here where I can line it up. And I’m going to fold my circle in half and in half like this. And then I’m going to just line that up on that line. So I’ll take the center of this and line it up right on the center there. Make sure that all my extending lines meet up. And then we’re ready to press that and put that on there. And then that will just stay on there and that’s how you center them. I’ve got one here that’s already pressed and adhered on. And you can even see, I hope, I have done a blanket stitch all the way around the outside of this circle. And so it just, it just holds it on. This is just a raw edge applique. And the little blanket stitch comes around to hold that on. You can use a little zig zag or whatever you like and it works fine. So then what we’re going to do is we’re going to take this square, and I’m going to lay my ruler, my five inch ruler right on the edge of this. And we are going to cut it in half both directions. So let’s go ahead and do that. There goes one. And then we’re going to turn our, either turn our mat or turn our strips, either way. And again lay my ruler right along the edge. You can line it up on your mat as well. And cut these so we get four exact quarters. How cool is that? Now what we’ve done different with this block than we’ve done with the regular drunkard’s path, because that right there is the drunkard’s path. But then we thought what we’d do is we thought we’d put a, snowball the two corners. Put a 2 ½ inch square on either corner. So we’re going to add a white 2 ½ inch square to this corner and a red 2 ½ inch square to this corner. And we did that. We just wanted to see what was going to happen. And so we’re going to go over to the sewing machine right now and we’re going to sew corner to corner diagonally right on these lines. Now if you need to finger press these just fold them in half like this to make you a little sew line by pressing it. You can draw the line too if you like. I just like to press mine so I have a little sew line. And then we’ll take these over there and we’re going to sew right on that line. Alrighty. Ok, there we go. We’re lined up on the corner. And we’re snowballing just the two opposite corners. And I”m going to bring this around. I guess I can clip it off there, bring it around and sew my red one on as well. Remember if you crease the line, it is easier to sew in the valley than on top of the mountain because it’s going to make your, your little square is going to have, if you turn it, you know if it’s over the wrong way it will have a little hump up. You don’t want that. You want it laying down so you have a little valley to sew in. Alrighty there. Now we’re going to come back over here and we are going to trim these corners off. Let me get rid of that pin. There’s nothing worse than running your rotary cutter right over a pin. That’s a great way to lose a blade really quick. Alrighty here we go. Ok, now the corners are off. Now we’re going to press this open. Look at what a cool block that is. It’s just so fun to try things to see what’s going to happen. So now I’m just going to press these straight out from the center. And it gives you this great little block. There’s so much you can do with this and so many ways to lay it out. So have fun with this. The way we laid it out, we’ve got a block here. We’ve sewn four of them together like this to make our big block. It’s a little easier to put them together that way. And once you get your big block done, keep it as a pattern because you want your patterns, you know you want your pattern to remain the same. And so what we’re going to do is we’re going to put this together. So we have one white up and one white down like this so they kind of trail. And then this one is the same. It’s going to be one red up and one red down. And you’re going to sew it together just like a four patch. I mean we’ll sew these two and we’ll sew these two and then we’ll sew the two blocks together and it will give you this block. So let’s look at how this pattern happens because this is really fun. So as you put these together, see how they line up like this. Alright so six across by seven down. And that’s going to make a quilt that’s about 64 by 73. So it’s a great size quilt. This is a great block. There’s all kinds of ways to set this out and lay them together. Have fun with that. Give it a try. You know just play with it and have some, have some, see what happens. Just see what happens. And we hope you enjoyed this tutorial on the Cornered Drunkard’s Path from the MSQC.
...& Progress on Social